Home Solar: Installing the Junction Box
Click Video to Watch
Home Solar: Installing the Junction Box
The most important thing to take away from this Home Solar lesson is..
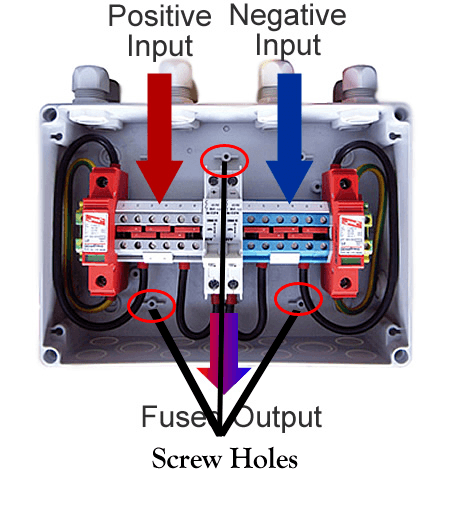
Now we’re going to install the home solar junction box. The junction box is important because it connects your solar panel to the outside world, and secures your connections from the outside of the solar panel. It’s second purpose is to give you an easy way to connect and disconnect the solar panel, for maintenance or repairs, or to create a series of solar panels (a solar array) together. In addition, it adds an overall professional look to the entire panel.
For this lesson you’ll need
· Power drill
· Drill bit
· Soldering iron
· Solder
· ½ inch wood screws
· Transparent silicone
· Caulking gun
Note about junction boxes: They come in all shapes and sizes. I would find a junction box that has blocking diodes already installed inside. This is to prevent the back-flow of current. For your solar panel you can get a small junction box, one that is just wide enough to completely cover the 2 holes you drilled in the frame and where your bus wires are currently coming out.
OK, so let’s begin finishing your home solar panel.
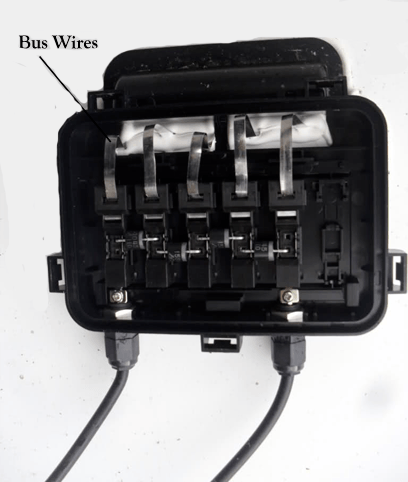
Start with your bus wires and make a quick note which is positive and which is negative. It’s even a good idea to mark them if you can do so.
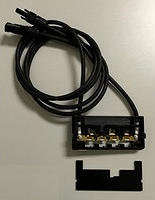
Many junction boxes come with wires and leads already connected which is what I recommend you try to find on Amazon or eBay.
The junction box is placed on the backside of the panel over the holes where you ran you ran the bus wires out of the solar panel in previous steps.
If you remember in step one we drilled 2 holes in the frame. Later we ran the both the positive and the negative bus wires down those holes.
Turn the solar panel over and position the junction box directly over those holes.
Many junction boxes come with wires and leads already installed which is what I recommend you buy.
Most junction box will allow you to easily slide the bus wire from the solar panel inside the slot of the junction box. Once you slid the bus wires in, it is good idea to solder the bus wires to the junction box leads.
All junction boxes have the same basic concept of hooking them up and installing them on your solar panel. This is meant as an overview of what you need to do to install the junction box. Of course, I don’t know what junction box you bought, or its design. So this has to be general to cover most boxes. If you need help on your particular junction box, the supplier is a good place to ask questions.
After connecting the positive and negative bus wires to the junction box, use your handy multimeter and hook up the leads to the junction box leads to make sure you’re receiving the correct voltage.
Make sure the junction box is completely covering the 2 holes in the frame.
Next, find a place inside the junction box your drill two holes, usually in the center, where you can pre- drill 2 holes and screw the junction box down to the frame.
The junction box should be sturdy enough that it is unable to move around on the frame.
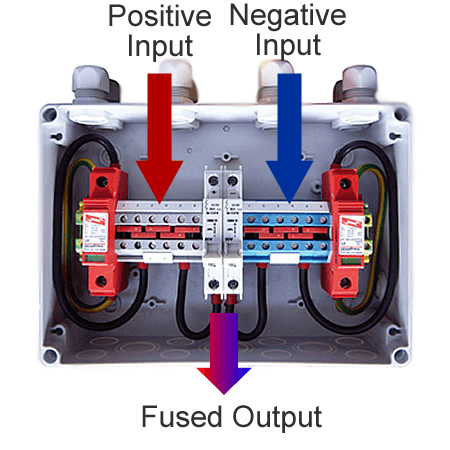
It should be fairly obvious where the positive and negative bus wires go in the junction box. Again, depending on the junction box you buy this process might be different, but in a nutshell you just want to make sure the bus wires are going to the correct terminal.
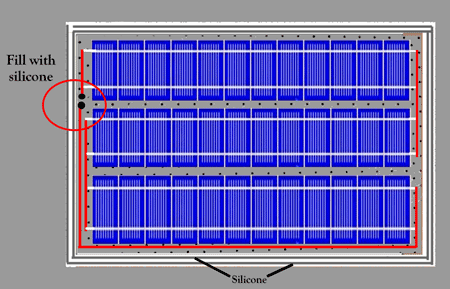
Add a bead of silicone around the base of the junction box where it lays flush against the frame.
Once the bus wires have been connected, and the silicone has dried around the base of the frame, put the lid on the junction box and screw it down tight.
Next flip your entire solar panel over, put it in the sun and check the voltage output one final time.
You should now have a fully finished and working home solar panel.
Downloads/Resources (Click to view or right click to download)
Checklists, Cheat sheets,...