Click Video to Watch
Course Summary: Energy Saving Tips
The most important thing you need to take away from this lesson is…
One of the most important and cost-effective energy saving tips you can do is to do a good job at air sealing your home. This alone can reduce your energy consumption by as much as 50%.
Areas of typical air leakage and where these energy saving tips can help you

DIY Air Sealing
You may wish to tackle some of these energy saving tips yourself. Most of the tools required are simple ones you probably already have around the house. Air sealing the house doesn’t require extensive knowledge or building experience. Most of this is common sense. If you do decide to do it yourself, you’ll realize considerable savings in doing so.
You may also wish to hire a contractor or handy-man to do the job. Nothing wrong with that either. The “do-it-yourself” approach doesn’t appeal to everyone. If you do hire a contractor you’ll go forearmed knowing exactly what has to be done, and whether the person you hire is doing a good job.
Having said that, some jobs are best left to professionals.

Foam insulation, for example, requires specialized equipment. Excavating the foundation of your house, if needed, isn’t everyone’s idea of a relaxing weekend. Simply use good judgment.
In any event, at this point you already know where the most serious problems are, and where you need to concentrate your time and money.
Refer back to the worksheet from the last lesson. Pay special attention to the severity ratings. The higher the rating, the more important it is to get that aspect done. I’m willing to bet, most of the severe items are ones you can do yourself. Save the tough and/or professional jobs for later when time and money permit.
Sealing most air leaks isn’t going to require a professional. Most of the time you can do a very credible job with caulking and weather stripping.
What You Can Do Starting Today
Planning:
- Using the worksheets you complied last week, decide which jobs are “do-able” and which jobs should be contracted out.
- Building Codes: Depending on how extensive the work is that needs to be done, you may want to consult with your local building official. I know, I know, lots of horror stories abound. The truth is, they are free resource of information and techniques you shouldn’t overlook. They can provide guidance on technical issues as well as dependable, local people to do the job.
- Safety: Don’t be an idiot. Climbing around on ladders, working around insulation in attics with no flooring or footing is dangerous. You’ll step through the ceiling, and maybe into the ground floor in a heartbeat.
- Use basic safety equipment, steel –toed shoes, dust masks, work gloves, eye protection if needed. Make sure you have more than adequate light, especially when working in the attic, or around the sills in the basement.
Stopping Air Leaks Once and For all:
Now that we know where the air leaks are, we’re going to start the business of sealing the most common ones
- Plumbing penetrations through floors and ceilings
- Chimney penetrations through floors and ceilings
- Fireplace dampers
- Attic access hatches Recessed lights and fans
- Wiring penetrations through floors, ceilings, walls
- Electrical outlets and switches on exterior walls
- Window, door, and baseboard moldings
Caulking:
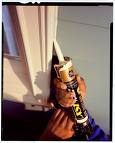
This energy saving tip is done with an inexpensive “gun” and a tube of sealant. Just about any home improvement store, Wal-Mart, even a lot of supermarkets, will carry them.
There are literally hundreds of caulking material available. Discuss with the salespeople the best for your project, or simply read the various information available about each.
Avoid the temptation to purchase cheap, poor-quality caulking material. It won’t last, goes on badly, and you’ll have wasted your time and money. White silicone works well in most situations.
- Use high temperature silicone on areas around the chimney or hot water heater flue.
- Never caulk in cold weather. Caulking should be applied in as close to room temperature as possible.
Identify the areas to be caulked and determine correct sealant for the job.
- If it is behind baseboards, ceiling moldings, door or window frames, then…
- Using a pry-bar, gently pry these off the wall, careful not to splinter them, and set them aside in a safe place.
- Clean any areas behind the moldings.
- Large cracks or holes greater than ¼” should be filled with oakum or foam rope.
- Cut the nozzle of the sealant tube just large enough to overlap the crack.
- Pull the caulking gun at right angles to the crack, evenly sealing the entire crack.
- The finished “bead” should be smooth and clean.
- You can finish the bead, if needed by smoothing the bead with your finger.
- If necessary stuff larger holes with oakum and seal around those.
- Pay special attention to the area where the sill meets the foundation and house. This area may require insulation, oakum, or sealant. It’s very important to seal this area up tight.
Caulk behind the baseboard, the ceiling moldings, around the windows and doors.
Take it one room at a time. No reason to rush through this job. If you have 10 rooms in your house and it takes 10 weeks to do a good job, it is time and money very well spent.
Windows:
- Using a pry-bar, gently pry the window molding away from the window.
- Take out any nails, and set window casing to one side.
- Using foam sealant or oakum, fill in any spaces around the window or wall framing.
- Apply caulking to any areas less than ¼” inch.
- Allow to dry, and replace window casing.
Don’t forget on a sunny day to also seal the outside of the windows as well. Use an outside sealant for this job.
Doors:
You also need to repeat this procedure on the inside of any doors as well. It’s not necessary to do this however on any interior doors leading into other rooms. I’m talking about sealing any doors leading to the exterior of the house.
Sealing Outside Doors: All four edges around a door can permit air to leak in and out of your house. In fact, the average door has more gaps than a loose-fitting window. Doors, moreover, don't run in grooves as windows do, so any crack area around a door is likely to be far greater than the area around a window. Weather stripping your doors can seal those gaps, get rid of drafts, and help to reduce your heating and cooling bills
The easiest method of weather stripping doors is to use adhesive backed foam.
To install pressure-sensitive foam weather stripping around doors:
Select warm day to work, if possible. Adhesive forms a better bond if applied when temperature is at least 60 degrees Fahrenheit.
Clean surface where weather stripping is to be attached with detergent and water. Make sure no dirt or grease remains. If pressure-sensitive weather stripping had been previously installed, use petroleum jelly to remove any old adhesive. Dry surface with rags.
Use scissors to cut strip to fit, but don't remove backing paper yet.
Starting at one end, slowly peel paper backing as you push sticky foam strips into place. If backing proves stubborn at beginning, stretch foam until seal between backing and foam breaks.
Attach strips on hinge side to doorjamb.
Attach other two strips to doorstop. If corner of door catches weather stripping as you close it, trim top piece of foam on hinge side. Serrated-metal weather stripping, usually with a felt-strip insert running the length of the serrated groove, also can be used to seal air gaps around doors. To install this type of weather stripping, measure the length of strips required, and then use tin snips or heavy-duty scissors to cut the serrated-metal material to the proper lengths. Nail each strip at both ends, add a nail to the center of each strip, and drive additional nails every 2 to 3 inches along the rest of the strip.
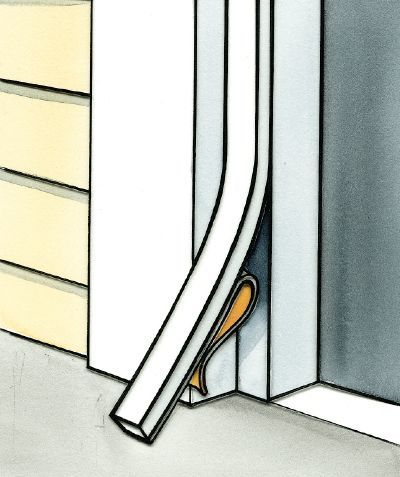
Creating a weather tight threshold:
The gap at the bottom of the door is treated differently from the gaps on the sides and along the top. The wood or metal hump on the floor along the bottom of the door is called the threshold.
Many of the metal types feature a flexible vinyl insert that creates a tight seal when the door closes against it. Other thresholds consist of one unit on the floor and a mating piece on the bottom of the door. These two pieces interlock to form a weather tight barrier.
In most cases, the threshold with a flexible vinyl insert is the easiest to install. Interlock systems are quite effective when properly installed, but they require a perfect fit or they will not work satisfactorily.
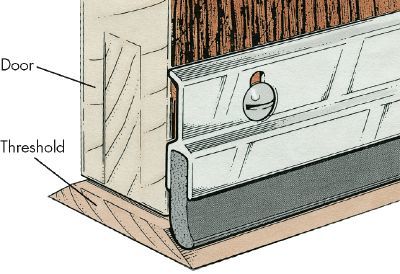
Wooden thresholds often wear down to the point where they must be replaced. This is an easy installation, and there are many types of replacement thresholds from which to choose. Most are aluminum and come in standard door widths; however, if your door is not standard width, you can trim the aluminum threshold with a hacksaw. Here's how to install a replacement threshold:
Remove old threshold. If it is wood, there are two ways to remove it. In most cases, you can pry it up after removing doorstops with small flat pry bar or putty knife, but you must work carefully and slowly. If jamb itself rests on threshold, saw through old threshold at each end.
Use backsaw placed right against jamb, and saw down through threshold, being careful not to scar floor. Once you make cuts, threshold should be easy to pry up. If prying doesn't work, use chisel and hammer to split piece. Metal thresholds are frequently held down by screws concealed under vinyl inserts. Once you remove screws, threshold will come up easily.
Install replacement threshold by driving screws through metal unit and into floor. If you don't want aluminum threshold, cut replacement from wood, using original one as pattern.
Install door sweep to seal gap. Most sweeps are attached to inside of door with nails or screws. Cut sweep to size, and close door. Tack both ends of sweep to door, then install remaining nails or screws. If you are using screws, drill pilot holes first.
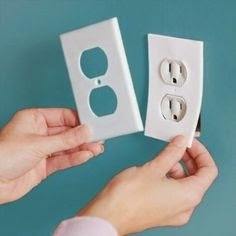
Air Sealing Electrical Outlets
Foam gaskets are designed to fit behind the cover plates of electrical receptacles, switches and lighting mounts, reducing air leakage into walls and attics.
Electrical outlet gaskets are more effective when caulked and should be used in conjunction with child-safety plugs to reduce air leakage through electrical sockets.
These can be easily and inexpensively found in almost all home improvement stores.
Simply unscrew the outlet plate from the wall, add the foam backing and replace the face plate. Screw tightly to the foam underneath.
As an added measure you can also use clear sealant and seal around the edges of the face plate insuring a tight, air sealed, receptacle.
If you follow these energy saving tips the inside of your house will be air sealed.In the next lesson we'll tackle the basement and save even more money.
Downloads/Resources (Click to view or right click to download)
Checklists, Cheat sheets,...
