Click Video to Watch
Course Summary: Save On Energy: Exterior Air Sealing
The most important thing you need to take away from this lesson is…
Sealing the outside walls is the last step in the arsenal of making your house as energy efficient as possible.
You can save on energy even more by air sealing your exterior. Windows and doors can account for up to 25 percent of total house heat loss. Since we have already started this by sealing up the inside areas of the walls and windows, now we will finish this by air-sealing the outside.
Save On Energy: Exterior Air Sealing

First thing…Assess your situation
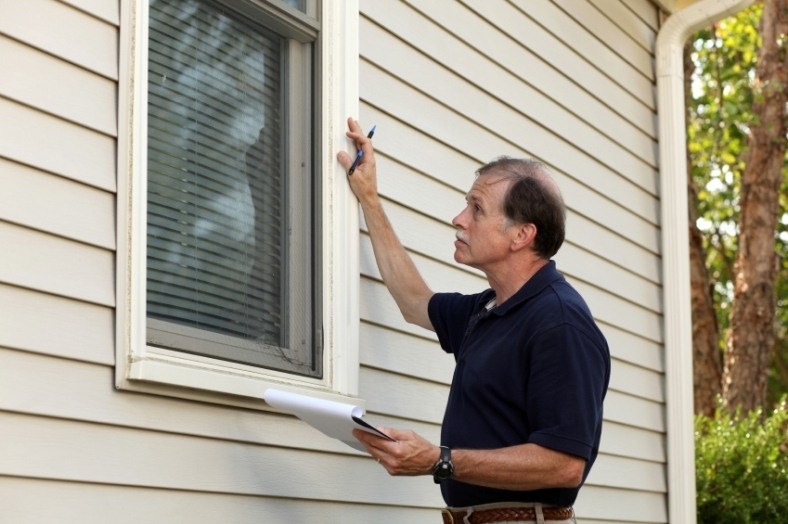
Take a careful walk around the outside of your home. The specific areas you want to look at are…
· Windows. Look carefully around the edges where the window frame meets the siding. Is it sealed? If not, make a note. Get a ladder and check the upper edge of the windows.
Heat loss through and around your windows is costing you more money than you might think. Cold air entering your house through cracks and crevices around windows can make for an uncomfortable living environment.
· The same goes for your doors. Check thoroughly around all edges.
· Look for any utility entrances into your house. These could be cable TV, Telephone, electrical, or water.
· Examine where your exterior siding meets the foundation. Are there any gaps or holes?
Now, let’s look at windows in more detail…
Excessive condensation can be a sign that a window needs some work.
Windows allow natural light and fresh air to enter our houses, provide a view to the outdoors and can serve as vital emergency exits. But windows can also be responsible for unnecessary heat loss, high energy consumption and cold drafts, and can be subject to condensation problems.
Using this information will help ensure that these problems are kept to a minimum by improving the energy efficiency and performance of your windows using products that are available at your local hardware or building supply store. Improving the energy efficiency of your home's windows can substantially reduce your home's energy use, cut your heating and cooling costs and reduce greenhouse gas emissions that contribute to climate change.
The Benefits of Energy-Efficient Windows
- · increase your comfort
- · Energy-efficient windows reduce cold drafts and make a house feel warmer during the heating season.
- · help control condensation
- · The interior surfaces of energy-efficient windows stay warmer, which means you can maintain a higher level of relative humidity without worrying about condensation on the windows (keep in mind that efficiency improvements to windows will not prevent condensation if the humidity level in your house is too high).
· Save you money
- · Minimizing air leakage and improving the thermal performance of your windows, by adding interior storm windows, for example, could improve their energy efficiency by up to 50 percent and reduce your energy bills.
· Last longer
- · Condensation can cause premature deterioration of windows, as well as walls and finishes, leading to costly maintenance or replacement.
- · improve indoor air quality and contribute to a healthy living environment
- · By reducing condensation, energy-efficient windows help prevent mould growth.
- · reduce the penetration of dust, dirt, insects and sound into your home reduce energy consumption and its impact on the environment
Double-hung window showing parts and air-leakage paths
Windows generally consist of a frame, sash and glazing. The glazing (usually glass) fits into the sash, which in turn is held in place in the wall by the frame. The trim provides a finish around the window. In general, fixed windows are more energy efficient than operable windows of the same size, material and orientation because they are more airtight and have more glazing (relative to the frame). This extra glazing area allows more solar heat to enter the house during the heating season.
What Are Your Options?
The following are four basic options for upgrading the energy efficiency of your windows:
- · Repair (see below)
- · Retrofit using caulking and weather-stripping
- · Reglaze by installing exterior or interior storm windows
- · Replace the window or parts of the window
What You Can Do Starting Today
Assess the Situation
As a first step, carefully assess the condition of each window in your house. Check for ease of operation and note whether the window has any defects, such as loose joints or glazing, warpage, damaged or worn weather-stripping, rot or faulty hardware. You may find that some windows need only minor air-sealing work, while others require major upgrading or even replacement.
Repairing Operable Windows
Some of the most common problems with operable windows relate to the ease of operation and the working of the hardware.
If the window appears to be in good shape, it may be possible to improve air tightness by doing the following:
- · adjusting or replacing the sash locks or adding more locks to large windows
- · repairing or replacing hinges on casement windows
- · ensuring that caulking, weather-stripping and paint are not interfering with the operation (opening and closing) of the window
- · ensuring that weather-stripping is fully functional (i.e., it should be flexible, be properly located and make full contact between the sash and the frame)
Proper window maintenance includes annual cleaning of the hardware, tightening of hardware screws and lubricating moving parts. You should also replace any cracked glazing. If major repairs are required, consider seeking the services of a contractor.
Retrofit – Start With the Basics
One of the quickest and easiest ways to save on energy and reduce heat loss through windows is to seal air leaks by using caulking and weather-stripping. This low-cost, do-it-yourself project can have a positive impact on your heating bills and home comfort.
Finding air leaks is simple. On a cold or windy day, take a thin piece of tissue or plastic and hold it near your window frames. If the tissue or plastic flutters, you've found an air leak. You can also detect a draft by using the smoke of a lit incense stick as an indicator. The next step is to seal the leak with caulking or weather-stripping.
Caulking
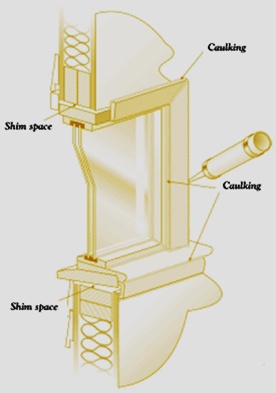
Caulking is used at fixed joints, such as where the interior window trim meets the wall or where the sash and frame come together in a fixed window. Make sure the product is intended for indoor use, can be painted and is of good quality.
On some windows, air leakage can be reduced by applying a continuous bead of caulking around the window trim, at the mitred joints of the trim, and between the trim and the frame.
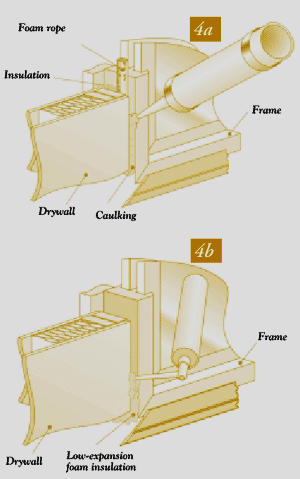
If a window is particularly leaky around the trim area and the trim can be easily removed and re-installed, consider removing the trim, adding insulation and sealing the gap before re-applying the trim.
If the gap is small (1/4 in. [6 mm] or less), insulating the gap followed by caulking may suffice. Larger gaps may require the use of either a backer rod with caulking or insulating low-expansion foam applied from an aerosol dispenser
If you have operable windows that you do not intend to open and that are not needed as emergency exits, consider sealing them shut for the winter by using easy-to-remove tape or peel-and-strip caulking.
Exterior Caulking
Exterior caulking is used primarily to prevent rain from entering the wall from the outside. Caulking on the outside of a window should be done only after interior sealing is complete. If the exterior is caulked first, it can trap warm, moist air in the wall, which can, in time, damage the wall.
Warning: Do not use exterior caulking products indoors as they may give off harmful fumes.
Weather-stripping
Weather-stripping is used to prevent air leakage at the parts of an operable window that move and pay for itself with energy savings In most cases, it is a simple task to replace worn weather-stripping or to install additional weather-stripping if required. Good quality weather-stripping costs more but will pay for itself by performing better and lasting longer. Check with knowledgeable salespeople when selecting a product.
For older wood-frame windows, look for a good quality, self-adhesive plastic V-strip weather-stripping. This product can be installed in very small spaces, works in both sliding and hinged applications, and can often be installed without removing any part of the window. Hinged windows usually require a combination of V-strip and compression-type weather-stripping. Follow the manufacturer's instructions when installing either of these products.
Where to weather-strip a single-hung window
Many older houses have single-hung windows with one fixed sash and one operable sash. Use the technique shown in these figures to weather-strip:
- The side of the sash,
- The meeting point of the upper and lower sashes,
- The sill.
Brush weather-stripping on a sliding window
To replace brush weather-stripping on a sliding window, remove the sash and pull the old weather-stripping out of its slot. Cut the new weather-stripping to the length required, and snap or slide it into the slot. Tack or staple the ends of the brush to ensure that it stays in place before re-installing the sash.
Weather-Stripping Doors

- Doors, like windows, should fit snugly so that air cannot sneak in around the edges. Poor installation, years of hard use, shifting foundations and seasonal warping can often force doors out of line with their frames. If they don’t fit snugly, fix or replace the weather-stripping.
- The same techniques for preparing windows applies to doors. This includes any needed repairs or adjustments, surface preparation and cleaning, and fastening the weather-stripping.
Around the frame. Weather-strip the tops and sides of any door frame as illustrated at right.
- The easiest and most effective weather-stripping for this use is a good quality V-shaped vinyl type. It makes contact with the edge of the door and provides a good seal even when the door warps from season to season.
- For increased protection, attach weather-stripping to the stop so that it presses against the face of the door as shown at right. There are also many types of combination metal and foam or rubber weather-stripping that are screwed to the stop. They should be adjusted regularly to conform to the changing warp of the door.
Bottom of the door. Apply weather-stripping to either the door sill or to the door itself. This can be a difficult area to seal well, but is worthwhile because this is often a source of major drafts.
Use durable material that can withstand traffic and be flexible enough to conform to changes in the door caused by humidity and temperature. The weather-stripping should also be easy to replace. A good seal can usually be obtained with gasketed door-bottom weather-stripping that attaches to the door, or with full or partial threshold weather-stripping that is attached to the door sill.
When the weather-stripping is applied to the door itself, a very durable material is necessary. The most readily applied and effective choice is the combination type, which is simply tacked or screwed along the bottom inside surface of the door. There should be slots that allow for some adjustment of the weather-stripping.
Also Seal exterior holes and entrances into your house
Be sure when evaluating your outside windows and doors to look for holes from cable TV, air conditioning, electrical, or any other places that may come into your home. Carefully seal these areas with a silicon sealant. Other areas to consider are…
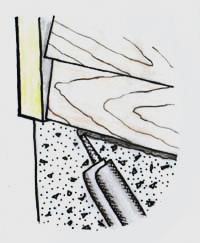
Carefully seal edges where your siding meeting meets any masonry or stone.
Carefully seal where your siding meets your foundation.
Should you come across a join larger than 1/8” you will need to use a backer rod to ensure proper adhesion and ply ability. Contrary to popular belief, more caulk is not always better, in fact in most cases its actually worse.
If huge amounts of caulk are applied to gaps larger than 1/8” the majority of the caulk will adhere to the back material and when the caulk shrinks or walls settle the caulk will crack and break its seal. If a backer rod is placed in the gap before applying the caulk, the caulk will take on an hour glass shape in section and will not adhere to the backer rod. This shape allows the caulk to stretch and move with the walls as they settle and move.
Now that you have finished sealing up all of your air leaks, pat yourself on the back because you just increased your efficiency by 20% to 50%. That not only translate into money savings, but your carbon footprint has also been reduced by 6,500 lbs. to 16,000 lbs. per year.
Now that you have finished sealing up all of your air leaks, pat yourself on the back because you just increased your efficiency by 20% to 50%.
By now you’re realizing at least a 50% savings on your utility bill, and probably more. You’ve eliminated drafts, and your home is more comfortable.
You are building the foundation of a life off the grid. This is an important first step.
Now we can turn our attention to reducing and/or eliminating heating and cooling. If you would have skipped the air sealing part, you would have been throwing money out the window in terms of wasted energy.
You can now save on energy even more by continuing this course in “Eliminate Your Heating and Cooling”
Downloads/Resources (Click to view or right click to download)
Checklists, Cheat sheets,...

Solar Hot Water Collector: The Best Guide to Building and Installing a Solar Hot Water System
Hello there, fellow solar enthusiasts! It’s great to be talking with you
Hybrid Solar Wind Power Generation System: Best Comprehensive Guide to Building Your Own Renewable Energy Solution
Hello there! If you are looking for an alternative energy source that
Solar Heating System: Best Comprehensive Guide to Building and Installing a Solar Heating System
As a solar heating system expert, I have seen firsthand how this
Solar Cooling: How to Keep Your Home Cool with Solar Energy?
Hey there, folks! As a solar cooling consultant with years of experience
Stand Alone Solar Power System: How to Build an Off-Grid Solar Power System for Your Home?
As the demand for sustainable energy solutions increases, stand alone solar power
Solar Heating Systems: The Different Types and Benefits Of Solar Heating Systems
As a solar heating systems expert, I know that these innovative technologies
